Apologies for the lack of a post yesterday. I spent Wednesday evening through today (so far) with my dad as he was getting some surgery and I just didn’t have the mental faculties necessary for most of my usual daily habits.
So, for today’s prompt I decided to pull from the official DayOne app website where they have a post for Journal Prompts. As I was scanning through I ended up on the Inspiration section and decided to combine a couple prompts, but I wanted to focus specifically on the artistic side of inspiration.
When it comes to painting miniatures I’ve taken a lot of inspiration from several mini painters that I’ve discovered on Instagram over the last few years. I see the different styles and techniques that they showcase, thinking about how easy they make it look, and I feel like I want to give them a try myself. Obviously, those styles and techniques of theirs have been honed over years of practice, but that doesn’t mean I can’t try them out to see where I might shine or need more practice. I’ve been good about not being discouraged when I don’t “instantly master” what I’m trying to imitate because I remind myself of these facts, but it also spurs me on to watch them again and again, to repeatedly dissect what I’m watching in different ways to see what I can glean.
In recent months I’ve taken to more general creative hobby crafting through the YouTube channel Nerdforge and the mind blowing things that they create. I find it not just inspirational but also refreshing when a wild new video is uploaded to their channel and it turns out to be something incredible like the full sized Warhammer “mini” they made. The ideas that get pulled together from different sources to create the final result is absolutely amazing and stretches the way my mind thinks about how to approach different situations with techniques that may not have been originally intended for the scale they were working on.
That’s where I’ve been getting a lot of my artistic inspiration these days, and as long as I keep watching these amazing people work, I believe I’ll always be able to find inspiration.
So, today’s daily writing prompt is actually one I already did about a year ago. Instead, I’m going to share something I’ve been slowly working on since April.
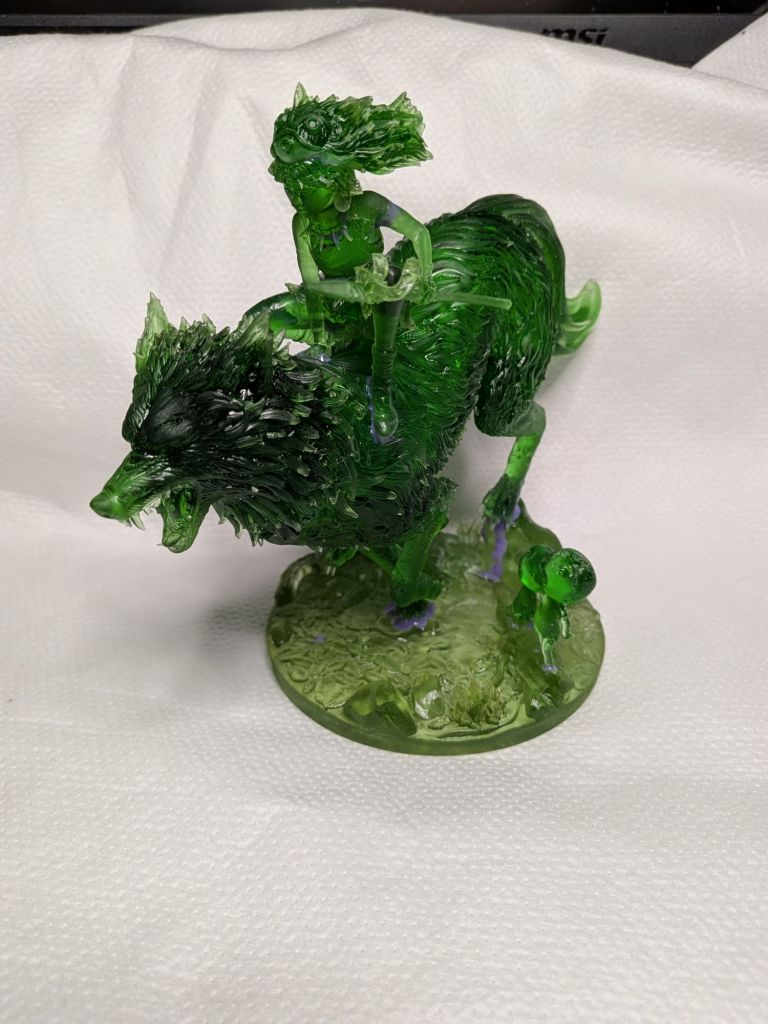
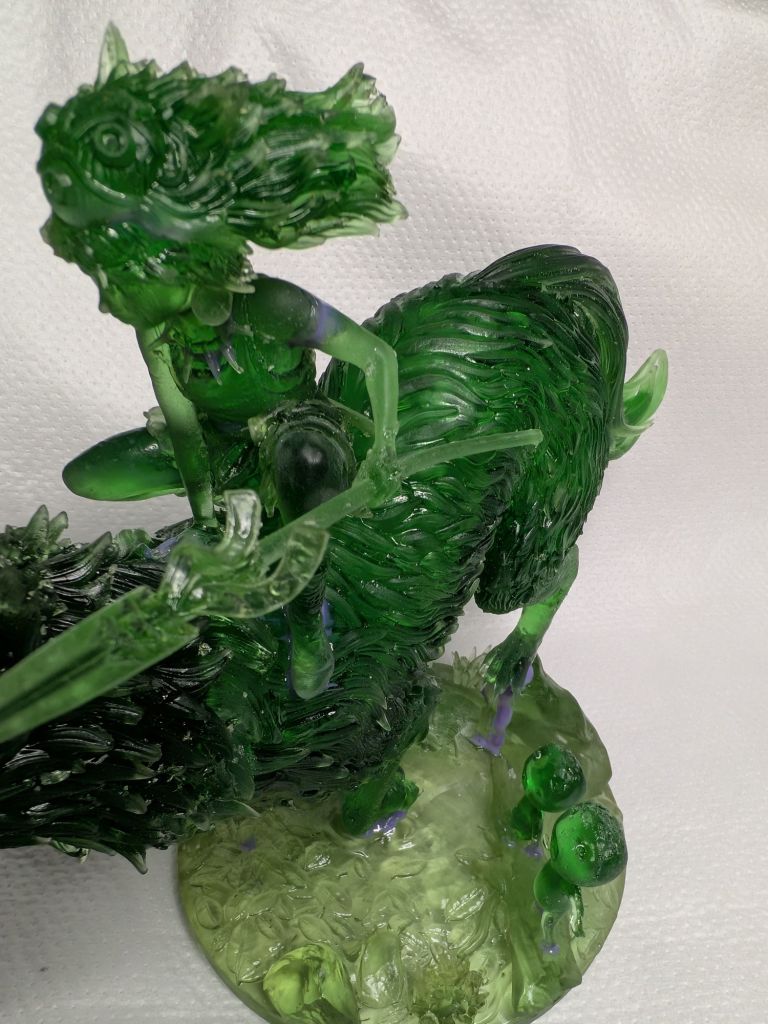
San from Studio Ghibli’s Princess Mononoke riding a wolf
I shared this over on my Instagram yesterday, and while I’m overall happy with the end result, I fully recognize I can do better with the painting of eyes.
Something I didn’t share over there is the backstory of how I got to the end result you see above. (If you want a TL;DR of the lessons learned from this little project, I’ll put those at the end.)
It started back in April, maybe even a little before that (technically, if you count when the first discussion with my sister-in-law was had) and there were some “speed bumps” along the way. (And unfortunately I didn’t take pictures of some things at the time, so you’ll only see the outcomes.)
See, I had actually attempted to 3D print and assemble this figurine before the final one I shared. It didn’t go well. Mistakes were made. Attempts to correct those mistakes were made, which ultimately failed and yielded very poor results.
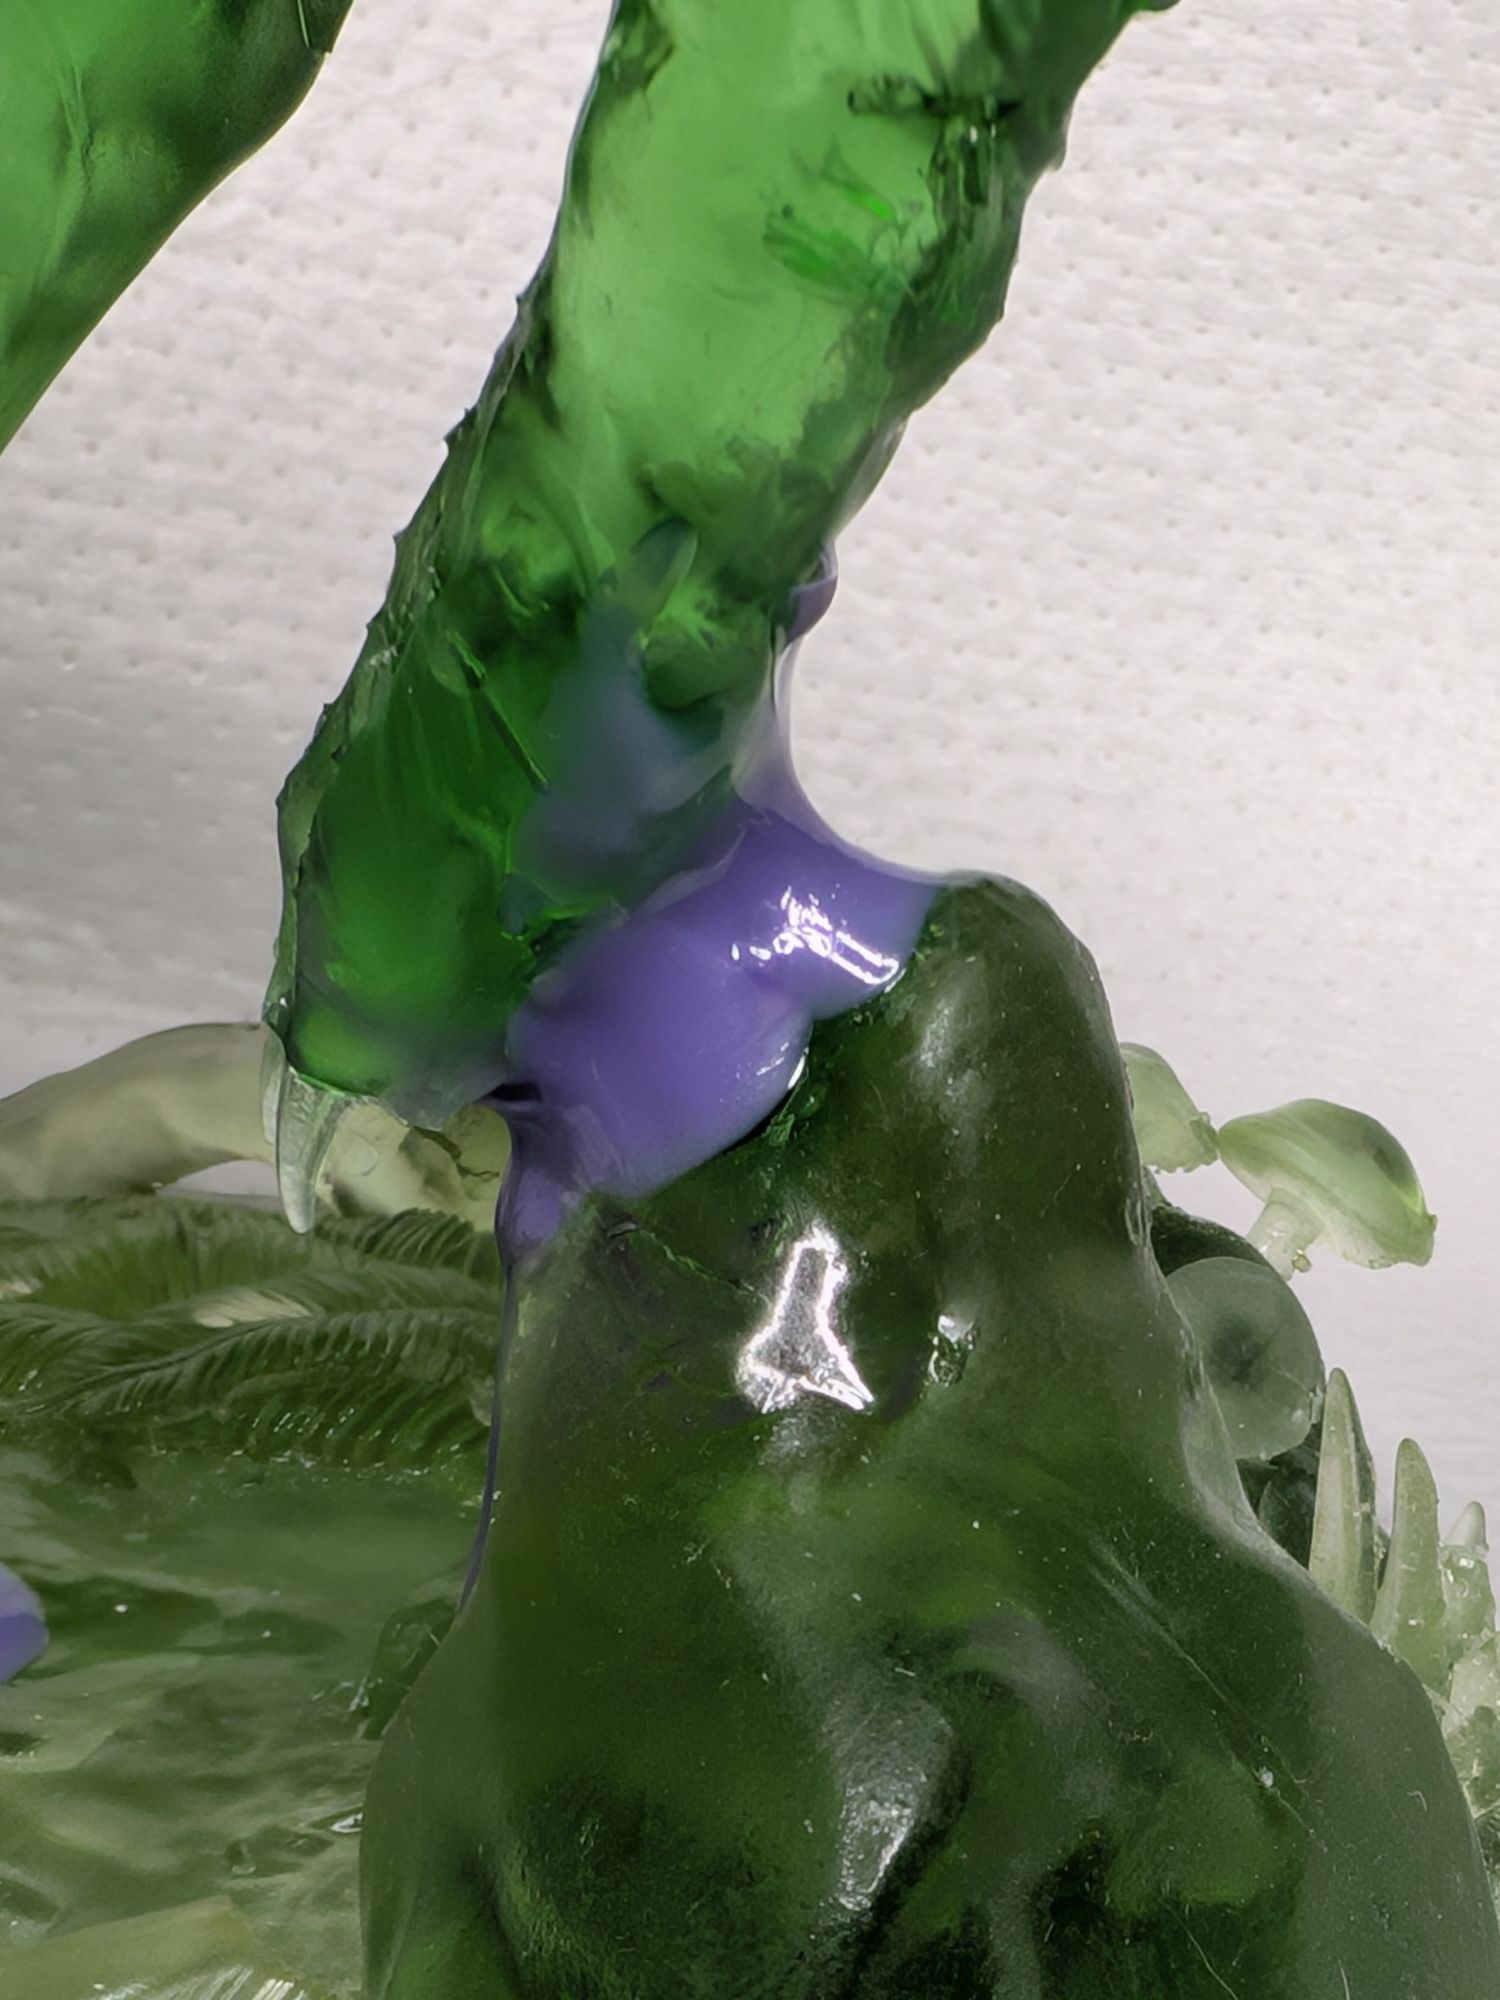
I had originally used a translucent green resin (because it was what I had plenty of at the time while working on another project) which actually turned out to be beneficial in the long run. That one particular detail may have saved me more headaches later on.
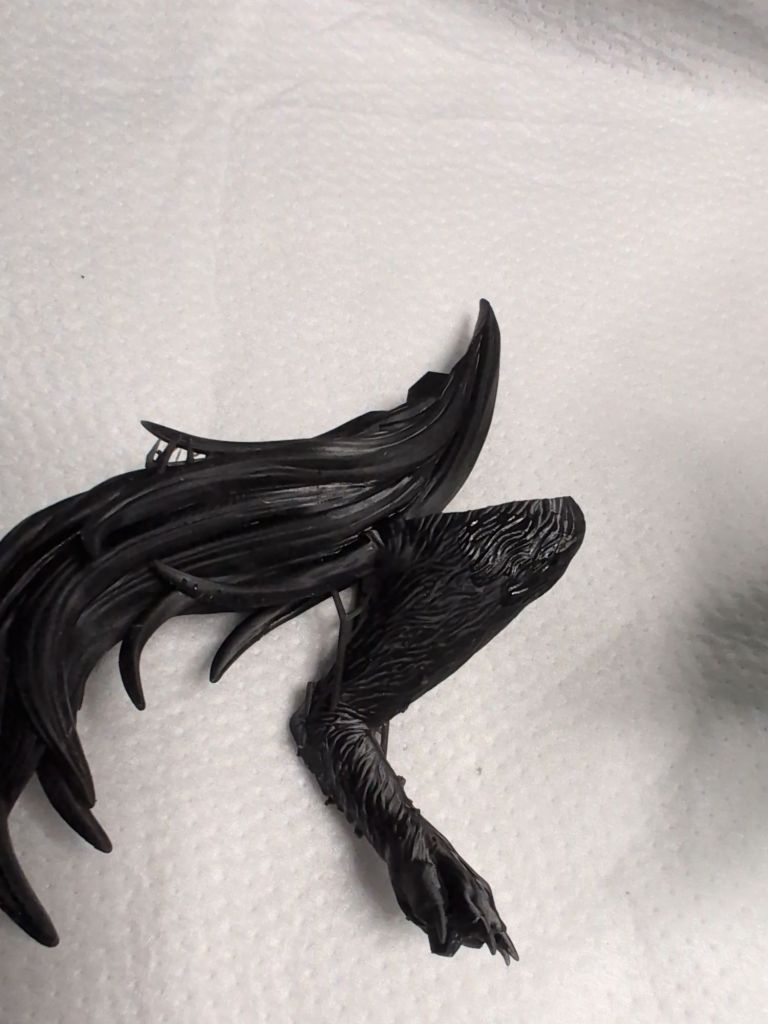
The first attempted print, assembled as best I could
If you look closely you can probably see one of the mistakes, even if you can’t quite tell why it’s a mistake in the first place.
San’s left arm is rotated 90° the wrong way
One of the things I failed to do was properly double check the original image to confirm the position of her left arm. (Something I would go on to VERY carefully check in the second attempt.) So, yeah. The bottom half of her spear is making contact with the body of the wolf and forcing it to bend.
I had a similar mistake with mounting the wolf to the base plate.
That back leg should be MUCH closer to the rock
What I had done, for both San and the wolf, was assemble their respective pieces together without checking on their contact points with each other, and the mounting points of the wolf to the base. What was SUPPOSED to happen was the one hind leg and front leg, each having a square-like protrusion, setting into slots that would hold them in place. What ended up happening? Well, the front leg fit just fine, but the hind leg was angled wrong. The square-like protrusion (or peg, or whatever you want to call it) was probably a centimeter off being able to correctly sit in the slot on the rock.
Observing my mistake and fiddling with the angles, I sat there scratching my head at how I fucked it up.
Well, I decided that I could try to fix it. How? By taking a jewelers saw and cutting a chunk off the top of the rock and “rebuilding” the resin up underneath the foot to properly support it.
Obviously, that didn’t turn out so well.
Regardless, I gave it my best effort, and then I made the mistake with San’s arm. With everything mounted and connected I looked over everything and decided to start from the beginning.
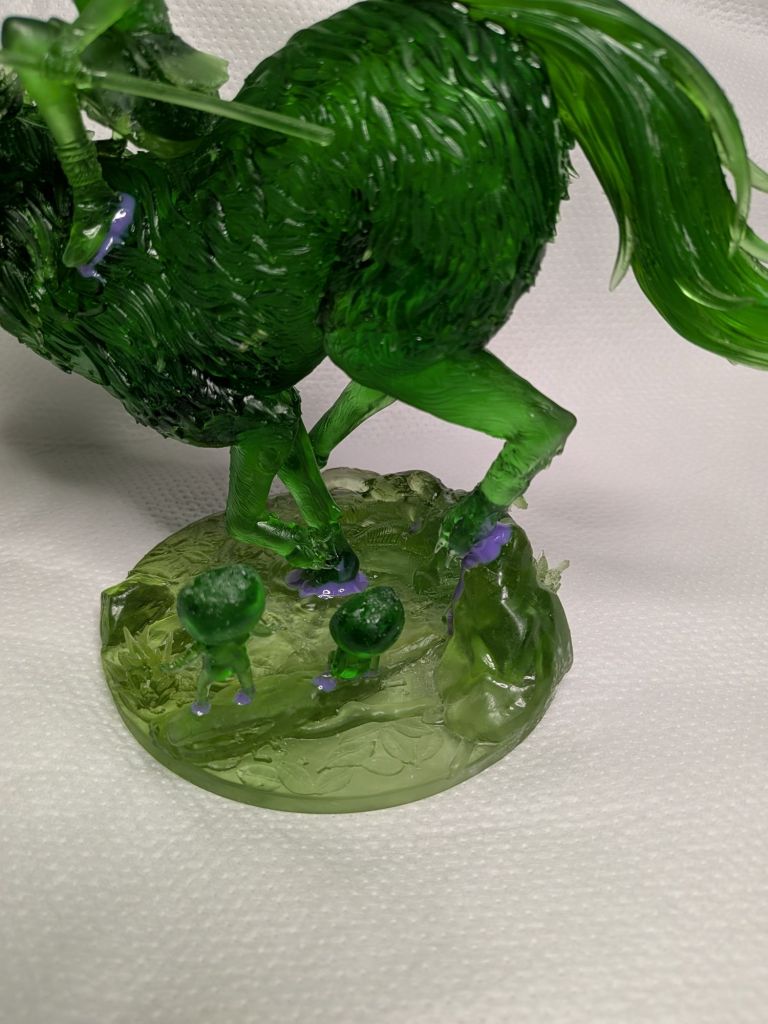
I remembered to take a picture this time. Look at the wolf with its purple leg and tail!
It took me about five months to work up the nerve/energy to try again, but for the second attempt I used some new resin I had ordered that was supposed to be water washable (it did well enough in that department). I did make one mistake in the printing process, but it wasn’t catastrophic. I just wasn’t paying attention to object placement in the slicer software.
The slicer software shifted things around when it generated supports. Oops.
Thankfully it was just the one leg and the tail. Those were easy enough to set up in a new sliced file and reprint, but unfortunately I had run out of the black resin, or at least didn’t have enough left to feel comfortable with the attempt. (I really didn’t want a repeat of the printing process from the first attempt that ran low and failed to print the base.) That’s why I ended up using purple resin, as you can see by the replacements I used above.
Once I had the new print pieces done and was happy with them, I made sure to check all the different connection points. The only one that ultimately failed in the second attempt is San’s right hand that is supposed to be on the back of the wolf. It doesn’t even touch, and no matter how I tried to get pieces aligned, it wasn’t going to sit in a satisfactory way, so I just shrugged it off and moved forward. Her feet fit correctly on the wolf and that was enough.
All in all, fun experience and plenty of lessons learned.
Oh, and before I forget, a bonus from what I mentioned earlier about the benefit of using the translucent green resin the first time.
I had the slicer software create infill scaffolding so the body wouldn’t be solid. I had to drain a lot of excess resin.
Here’s the TL;DR Lessons Learned:
If using Unsupported 3D objects in a slicer software: after using the “generate supports” feature, check the layout and positioning of your objects to make sure they don’t overlap. You don’t want fused pieces that need reprinting.
Something that should be noted before even hitting “print” is making sure your machine is level. If resin runs low enough in the vat, objects will not print correctly.
Adding on to the previous point, keep an eye on the level of resin in your vat so you know when to add more, just in case.
Printing a large object: if you choose to hollow it out in the slicer software, be prepared for excess resin being trapped inside. You’ll want to drain it.
When draining that excess resin: drill two holes, preferably on opposite ends of the object. Resin is viscous and extra air flow speeds up draining.
Drilling holes in an object: drill in spots that can be hidden. (I hid them in the tail slot and one leg spot.)
If you want to seal the holes: use more resin and an ultraviolet light source. (I ended up buying a strong UV flashlight for this project.)
Assembly time: check each individual piece that has connections. Check each connection and make sure they fit right before gluing/securing. This may mean holding several pieces together by hand and awkwardly fidgeting them around to see where things need to sit.
Gluing/securing resin prints: super glue works just fine if you have time and want to wait. Or you can use more resin and the UV flashlight.
Tip/advice: you can buy syringes and blunt needle tips in varying gauges. I used both straight and angled needle tips.
Lesson learned for the syringes: I ordered tubes that were supposed to provide UV protection. The UV light still got through a little bit. Keep that syringe away from the UV light sources as much as possible.
It’s really quite simple. Anything that I do that allows me to immerse myself into it and forget the things that have been stressing me out are things that help me relax.
Video games, reading/writing, painting miniatures while listening to music or podcasts (lately it has been Legends of Avantris and their Once Upon A Witchlight campaign on YouTube) and of course sleeping.
Each of these activities takes my focus away from the stressors of life and gives me a good distraction so that I can relax, often in an almost pseudo-meditative state of mind.
If you were going to open up a shop, what would you sell?
Painting miniatures was only the beginning. I started spinning this idea around my head after I started delving into the world of 3D printing, but it didn’t really solidify until last year.
In my annual search of homes for sale I stumbled across an interesting listing. The house was being sold with the small business building next to it. Two lots in one! On top of that, there was a third building that spanned across both lots, a detached garage for the house that was connected to a garage shop for the business building. The main business building included a small shop with a single garage door in the back.
When I shared this find with my sister her first thought was a dark room for her photography stuff. My first thought was getting a bunch of 3D printers running and selling both painted and unpainted prints.
I could have used the front of the shop for the main business, but there wasn’t much parking (and the driveway was shared between the house and business.) I probably would have just done something on Etsy and used the business building for storage.
Well, that was the idea, anyways. I still need a lot of practice with painting if I want to justify the business plan. Nobody wants a shoddy paint job on their minis.
Describe a random encounter with a stranger that stuck out positively to you.
A few months back my Dad decided to tag along with my sister to one of the game stores in town where she could pick up some Lorcana cards. During that trip is when my Dad learned about a tabletop game you might have heard of called Necromunda (part of the Warhammer 40,000 universe.) He watched a couple of guys at the store playing and was instantly drawn in.
Now, that encounter was solely for my Dad as I obviously was not there, but it is the precursor to the events of this past Saturday.
My Dad was welcomed in and the guys explaining the rules along with everything he needed to play. Then the store owner helped him pick out the things he needed to play but he didn’t buy anything on that particular trip. He waited until the next time, when he could ask me to come with, to buy the things he needed. You see, one of the most important things about any of the Warhammer kits you buy is that they aren’t pre-assembled and painted. My Dad knew that I had been dabbling in painting miniatures, and that if he asked I would handle all of that for him. Which I did end up doing.
I had never worked on any Warhammer stuff before, so it was a new experience for me. My Dad wanted me to bring my painting stuff to his house so he could spend time chatting with me while watching me work. I only ever came over on the weekends for a couple hours or so at a time, so it took a while to get things done. (In retrospect, I now know a few things I could have done differently to expedite the process.) It took a few months to get done because there were multiple weekends where we didn’t get together for our usual family gatherings. Sick kids, sick parents, bad timing all around for various reasons.
Anyways, I got all ten of the little guys assembled and painted, and my Dad brought them to the Warhammer store here in town (rather than the original game store we went to) so he could talk to some guys there about playing.
If you’re still with me, this is where MY encounter with a stranger was positive.
My Dad asked me to meet him at the store, so I obliged and headed over. When I got there the store owner was walking my Dad through how to play, and a couple of other guys were assembling and painting their own minis. The topic of painting came up, obviously, when my Dad mentioned I had painted his for him, and we all got to talking and sharing. The guys showed me what they were working on as well as a finished piece (some really cool mech thing with long skinny legs and a rail gun or something hanging from underneath) and I shared some of the things I had painted for Black Rose Wars and the Totally-Not-Atraxa that I had printed and painted.
We had a good conversation all around, and seeing other people work on (and struggle with) painting minis really helped me realize that, even with imperfections in my painting techniques, they were more or less like me in that area. That even if I keep to myself most of the time with this hobby, I am not alone, and not everyone will be as good as the people I see on Instagram.